What is Minimal API?
Minimal API is a simplified programming model within ASP.NET Core, introduced in .NET 6, designed for building lightweight, fast HTTP APIs with significantly less code and ceremony.
Instead of relying on the traditional MVC pattern with controllers and action methods, it uses top-level statements and direct calls like app.MapGet() to map HTTP verbs directly to lambda functions (delegates). Essentially, it allows you to create a complete, functional API with minimal boilerplate, making it perfect for microservices and quick, focused endpoints.
Difference between traditional APIs and minimal APIs
| Feature | Traditional API | Minimal API |
| Structure | In traditional APIs, logic is separated in different controllers and object oriented MVC architecture | Minimal APIs introduce the functional or inline structure. No need of writing controllers or writing big MVC object-oriented classes. Just write it inline(functional) and go |
| Routing | This is achieved by using HTTPVERBS or Endpoints | Simplified methods like MapGet() or MapPost() etc are directly available to use |
| Boilerplate | Requires a lot of things like class, services, endpoints etc | Minimalistic and ideal when you have small microservices or APIs that just does a few job |
| Performance | Optimistic performance where clean architecture is the key to design abstraction and layering | This is slight faster than traditional as there is a little overhead. The code is so minimal that reduces burden of resolving routes, looking into dependencies etc |
| Separation | Separation of concerns can be strongly implemented as well as can make use of variety of architectures | Since the concept of minimal API is to reduce boilerplate and to make lightweight, then limited separation is supported |
When to use Minimal APIs?
This is a good thing to know when we should use the minimal APIs specially designing architecture of an application that is expected to be running for years. For development point of view, minimum maintenance is the key characteristic of any application that client will like. So here are few cases when minimal APIs can be useful and okay to use –
- Microservices – Use minimal APIs when microservices are being developed. They contain separation of logics of a big application into chunks of functionalities, and each can be handled by different microservice and that microservice can run on different endpoint as well as can be extended separately if needed in the future. But if a microservice has minimum things to do then minimal APIs will be a great choice. Their lightweight nature, faster startup time, and high performance make them perfect for small, self-contained services.
- Serverless Functions – Cloud native development like AWS lambda or azure functions, the minimal APIs can provide lightweight experience in the development because of low ceremony and resource consumption.
- Rapid Prototyping – Minimum Viable Products (MVP) can be built in minimal setup of endpoints and code. MVPs are those products which focus on core values of the product and usually built for getting feedback and establishing future iterative development and market validations.
- Simple APIs – Simple APIs consisting only CRUD operations or basic functions that require low dependencies and lines of code, can be developed using minimalistic approach. Don’t worry, a simple API can be extended further if needed with this approach as well.
- Performance Critical Endpoints – As this avoid large overhead in the pipeline, performance criticality is improved and creates a smooth environment for development.
When not to use Minimal APIs?
After understanding the difference between traditional APIs and Minimal APIs and also after understanding where to use Minimal APIs, we also should understand where to avoid using it, so that we can implement it correctly.
- Large Scale Applications – Applications that are large and complex with a lot of business operations and separations of concerns, should not be developed using minimal APIs.
- Complex Domain Logics – Requirement context of a domain is too much complex then avoid using this.
- Pure Clean Architecture – If pure clean architecture or complete separate of concern is needed, then minimal API setup is not a good choice.
- Need MVC Features – MVC features like Model, View, Controller, Filters, Model Bindings, Views, Pages are not ideally supported by minimal API setup. So, avoid if it is MVC application.
- Enforced structure or coding convention –When the team is aligned with enforced coding conventions or architecture then minimal setup will enforce you to make many changes, so keep it untouched if that is the case.
Process of Minimal API Development
The entire process typically revolves around two core objects: the WebApplicationBuilder (for configuration) and the WebApplication (for defining the pipeline and routes).
Phase 1: Application Setup and Configuration
The first phase involves creating and configuring the base application using the .NET Core Minimal API template. The goal here is to establish the foundation on which endpoints and middleware will later be defined.
Steps involved:
Step 1: Create a Minimal Web API Project MinimalAPIExample
Step 2: Program.cs as the Entry Point
In a Minimal API, the Program.cs file serves as both the startup and entry point of the application. Unlike traditional ASP.NET Core projects, there’s no separate Startup.cs file. For example –
var builder = WebApplication.CreateBuilder(args);
var app = builder.Build();- WebApplication.CreateBuilder() sets up configuration, dependency injection (DI), logging, and other essential services.
- builder.Build() creates the WebApplication instance, which represents the configured app ready to handle requests.
Step 3: Register Services and Dependencies
Before defining endpoints, you can configure services such as database contexts, authentication, or custom services. For example –
builder.Services.AddEndpointsApiExplorer();
builder.Services.AddSwaggerGen();
Step 4: Configure Middleware (Optional at this stage)
Middleware components like Swagger, CORS, or authentication can be configured before mapping endpoints. For example –
app.UseSwagger();
app.UseSwaggerUI();
At the end of this phase, the application is configured, services are registered, and the app is ready to define its HTTP request pipeline.
Phase 2: Define the HTTP Pipeline and Endpoints
Now you define the pipeline and the endpoints that the API will use.
You define how the application handles HTTP requests. Minimal APIs use a simple and direct syntax for mapping routes and specifying handlers without the need for controllers.
Steps involved:
Step 1: Map Endpoints
Endpoints define how the API responds to HTTP requests such as GET, POST, PUT, and DELETE.
Further classification of the endpoints are given as below –
Basic HTTP Verb Mappings
| Method | Use | Example |
MapGet() | Maps HTTP GET requests. Used to retrieve data. | app.MapGet("/users", () => "Get all users"); |
MapPost() | Maps HTTP POST requests. Used to create resources. | app.MapPost("/users", (User user) => $"Added {user.Name}"); |
MapPut() | Maps HTTP PUT requests. Used to update an entire resource. | app.MapPut("/users/{id}", (int id, User user) => $"Updated {id}"); |
MapPatch() | Maps HTTP PATCH requests. Used to update part of a resource. | app.MapPatch("/users/{id}", (int id, JsonPatchDocument<User> patch) => $"Patched {id}"); |
MapDelete() | Maps HTTP DELETE requests. Used to remove a resource. | app.MapDelete("/users/{id}", (int id) => $"Deleted {id}"); |
MapMethods() | Maps custom HTTP methods or multiple verbs. | app.MapMethods("/users", new[] { "GET", "POST" }, () => "Custom mapping"); |
Grouping and Organizing Endpoints
| Method | Use | Example |
| MapGroup() | Creates a route group to organize related endpoints under a common prefix or policy. | csharp var users = app.MapGroup(“/users”); users.MapGet(“/”, GetAll); users.MapPost(“/”, AddUser); |
| MapControllers() | Enables MVC controllers alongside minimal APIs. Useful in hybrid setups | app.MapControllers(); |
| MapDefaultControllerRoute() | Maps the default route ({controller=Home}/{action=Index}/{id?}) for controllers. | app.MapDefaultControllerRoute(); |
Special Built-In Endpoint Mappings
| Method | Use | Example |
MapRazorPages() | Maps Razor Pages endpoints (used with MVC hybrid apps). | app.MapRazorPages(); |
MapControllers() | Maps attribute-routed controllers (again for hybrid apps). | app.MapControllers(); |
MapHub<T>() | Maps a SignalR hub for real-time communication. | app.MapHub<ChatHub>("/chathub"); |
MapGrpcService<T>() | Maps a gRPC service endpoint. | app.MapGrpcService<GreeterService>(); |
MapHealthChecks() | Maps health check endpoints for monitoring. | app.MapHealthChecks("/health"); |
MapBlazorHub() | Maps Blazor Server hub. | app.MapBlazorHub(); |
File and Razor Page Mappings
| Method | Use | Example |
MapRazorPages() | Maps Razor Pages endpoints (used with MVC hybrid apps). | app.MapRazorPages(); |
MapControllers() | Maps attribute-routed controllers (again for hybrid apps). | app.MapControllers(); |
MapHub<T>() | Maps a SignalR hub for real-time communication. | app.MapHub<ChatHub>("/chathub"); |
MapGrpcService<T>() | Maps a gRPC service endpoint. | app.MapGrpcService<GreeterService>(); |
MapHealthChecks() | Maps health check endpoints for monitoring. | app.MapHealthChecks("/health"); |
MapBlazorHub() | Maps Blazor Server hub. | app.MapBlazorHub(); |
WebSocket, gRPC, and Advanced Scenarios
| Method | Use | Example |
MapHub<T>() | Maps a SignalR hub. | app.MapHub<ChatHub>("/hubs/chat"); |
MapGrpcReflectionService() | Maps gRPC reflection for development tools. | app.MapGrpcReflectionService(); |
MapReverseProxy() | Used with YARP (Reverse Proxy) to map dynamic routes. | app.MapReverseProxy(); |
OpenAPI / Swagger Helpers
| Method | Use | Example |
MapOpenApi() | Maps OpenAPI specification endpoint (for OpenAPI v3). | app.MapOpenApi(); |
MapSwagger() | Maps Swagger JSON endpoint. | app.MapSwagger(); |
MapSwaggerUI() | Maps Swagger UI for interactive documentation. | app.UseSwaggerUI(); |
Advanced Route Features
| Feature | Example | Description |
| Route Parameters | app.MapGet("/users/{id}", (int id) => $"User ID: {id}"); | You can bind parameters directly from the URL. |
| Query Parameters | app.MapGet("/search", (string q) => $"Searching for {q}"); | Automatically bound from the query string. |
| Request Body | app.MapPost("/users", (User user) => Results.Created("/users", user)); | Automatically binds JSON body to model. |
| Dependency Injection | app.MapGet("/data", (IMyService service) => service.GetAll()); | Dependencies can be injected directly. |
| Filters (since .NET 8) | .AddEndpointFilter() | Apply filters like validation, logging, etc. |
Step 2: Integrate Business Logic
Minimal APIs allow you to inject dependencies directly into endpoint handlers, promoting simplicity and testability. For Example –
// Service being directly injected at the time of code
app.MapPost("/users", (User user, IUserService service) =>
{
    service.AddUser(user); // service method call
    return Results.Created($"/users/{user.Id}", user);
});
Step 3: Configure Middleware Pipeline
You can insert middleware such as authentication, authorization, or exception handling before or after endpoint mapping. For Example,
app.UseHttpsRedirection();
app.UseAuthorization();
To understand more about Middlewares in .Net Core, read my detailed blog by clicking here
These 2 phases are enough to build a minimal API in .NET core.
Practicle Example of Minimal API in .Net Core
I will create a demo application “MinimalAPIExample”.
This will use an in-memory database and following operations will be supported –
- Adds a new student record
- Returns all students
- Returns a student by ID
- Updates a student’s details
- Removes a student record
Create a web API project
dotnet new web -n MinimalAPIExample
cd MinimalAPIExample
To use in-memory database, we will need a package to install –
dotnet add package Microsoft.EntityFrameworkCore.InMemoryGo to program.cs and import a namespace here
using Microsoft.EntityFrameworkCore;This will enable the application to use entity framework and deal with the in-memory database using DB context.
Check if swagger is not installed, then install using below commands, we will use swagger for API test
dotnet add package Swashbuckle.AspNetCore
dotnet add package Microsoft.AspNetCore.OpenApi
By Default, program.cs should look like this
using Microsoft.EntityFrameworkCore;
var builder = WebApplication.CreateBuilder(args);

builder.Services.AddEndpointsApiExplorer();
builder.Services.AddSwaggerGen();

var app = builder.Build();

if (app.Environment.IsDevelopment())
{
    app.UseSwagger();
    app.UseSwaggerUI();
}

app.UseHttpsRedirection();
app.Run();
Let’s create a class StudentDb which will act as a DBContext
using Microsoft.EntityFrameworkCore;
namespace MinimalAPIExample
{
    public class StudentDb : DbContext
    {
        public StudentDb(DbContextOptions<StudentDb> options) : base(options) { }

        public DbSet<Student> Students => Set<Student>();
    }
}
Code for Student Class, create and use it
namespace MinimalAPIExample
{
    public class Student
    {
        public int Id { get; set; } // Primary Key
        public string Name { get; set; } = string.Empty;
        public int Age { get; set; }
        public string Grade { get; set; } = string.Empty;
    }
}
Now go to program.cs and add the DBContext in WebApplication builder’s services set. This will use that context in the pipeline –
builder.Services.AddDbContext<StudentDb>(opt => opt.UseInMemoryDatabase("StudentDb")); // Name it anything Now we will add endpoints –
// CREATE
app.MapPost("/students", async (Student student, StudentDb db) =>
{
    db.Students.Add(student);
    await db.SaveChangesAsync();
    return Results.Created($"/students/{student.Id}", student);
});

// READ - Get All
app.MapGet("/students", async (StudentDb db) =>
    await db.Students.ToListAsync());

// READ - Get by ID
app.MapGet("/students/{id}", async (int id, StudentDb db) =>
    await db.Students.FindAsync(id)
        is Student student
            ? Results.Ok(student)
            : Results.NotFound("Student not found"));

// UPDATE
app.MapPut("/students/{id}", async (int id, Student updatedStudent, StudentDb db) =>
{
    var student = await db.Students.FindAsync(id);
    if (student is null)
        return Results.NotFound("Student not found");

    student.Name = updatedStudent.Name;
    student.Age = updatedStudent.Age;
    student.Grade = updatedStudent.Grade;

    await db.SaveChangesAsync();
    return Results.Ok(student);
});

// DELETE
app.MapDelete("/students/{id}", async (int id, StudentDb db) =>
{
    var student = await db.Students.FindAsync(id);
    if (student is null)
        return Results.NotFound("Student not found");

    db.Students.Remove(student);
    await db.SaveChangesAsync();
    return Results.Ok($"Student {id} deleted successfully");
});
Place the code before app.run()
Your final program.cs will look like this
using Microsoft.EntityFrameworkCore;
using MinimalAPIExample;

var builder = WebApplication.CreateBuilder(args);

// Add services
builder.Services.AddDbContext<StudentDb>(opt => opt.UseInMemoryDatabase("StudentDb"));
builder.Services.AddEndpointsApiExplorer();
builder.Services.AddSwaggerGen();

var app = builder.Build();

// Configure middleware
if (app.Environment.IsDevelopment())
{
    app.UseSwagger();
    app.UseSwaggerUI();
}

app.UseHttpsRedirection();

// ===================== CRUD Endpoints =====================

// CREATE
app.MapPost("/students", async (Student student, StudentDb db) =>
{
    db.Students.Add(student);
    await db.SaveChangesAsync();
    return Results.Created($"/students/{student.Id}", student);
});

// READ - Get All
app.MapGet("/students", async (StudentDb db) =>
    await db.Students.ToListAsync());

// READ - Get by ID
app.MapGet("/students/{id}", async (int id, StudentDb db) =>
    await db.Students.FindAsync(id)
        is Student student
            ? Results.Ok(student)
            : Results.NotFound("Student not found"));

// UPDATE
app.MapPut("/students/{id}", async (int id, Student updatedStudent, StudentDb db) =>
{
    var student = await db.Students.FindAsync(id);
    if (student is null)
        return Results.NotFound("Student not found");

    student.Name = updatedStudent.Name;
    student.Age = updatedStudent.Age;
    student.Grade = updatedStudent.Grade;

    await db.SaveChangesAsync();
    return Results.Ok(student);
});

// DELETE
app.MapDelete("/students/{id}", async (int id, StudentDb db) =>
{
    var student = await db.Students.FindAsync(id);
    if (student is null)
        return Results.NotFound("Student not found");

    db.Students.Remove(student);
    await db.SaveChangesAsync();
    return Results.Ok($"Student {id} deleted successfully");
});

app.Run();
You can see whole application has been wrapped in one file (2 supportive and 1 main file). This is perfect Example of Minimal API Setup in .Net Core
In the methods, you can see that DBContext is directly being injected into method itself, that removes the tight dependency on other class for context.
The endpoints are clean and managed.
When you will run the code, this you will get as a swagger screen
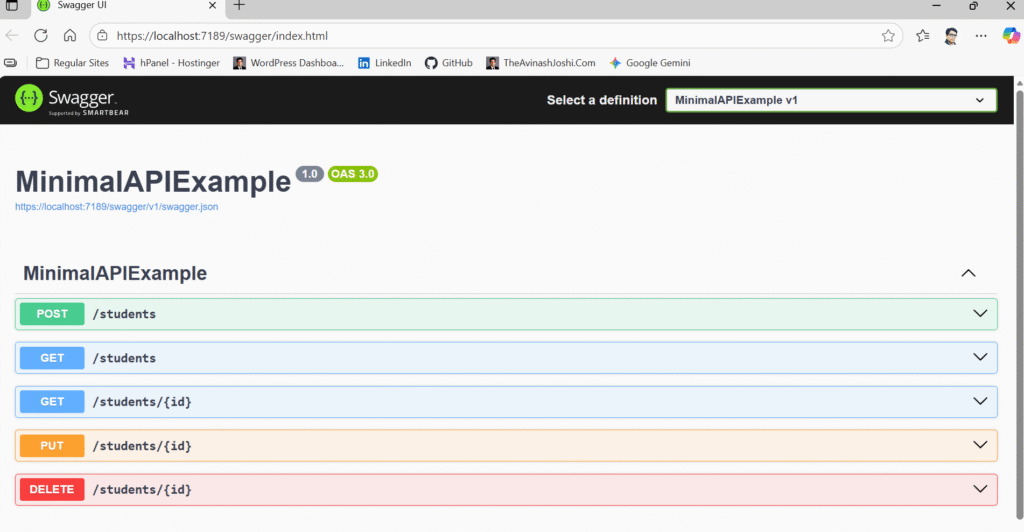
Let’s test the POST
curl -X 'POST' \
  'https://localhost:7189/students' \
  -H 'accept: */*' \
  -H 'Content-Type: application/json' \
  -d '{
  "id": 1,
  "name": "Avinash",
  "age": 35,
  "grade": "A+"
}'
Output is 201
Let’s Test Get
curl -X 'GET' \
  'https://localhost:7189/students' \
  -H 'accept: application/json'
It will fetch all records
Let’s test GetbyID
https://localhost:7189/students/1That returns record with id=1
So this is pure example of the Minimal APIs
Conclusion
Developing a Minimal API in .NET Core provides a lightweight, efficient, and modern way to build web services. Unlike traditional controller-based APIs, Minimal APIs focus on simplicity and performance by reducing boilerplate code and streamlining the request pipeline.
In this article, we explored the process of Minimal API development, covering:
- Phase 1: Application Setup and Configuration – where we initialized the project, configured essential services, and prepared the environment.
- Phase 2: Defining the HTTP Pipeline and Endpoints – where we mapped routes and implemented CRUD operations using clear, minimal syntax.
- Finally, we implemented a real-world CRUD example using an in-memory database, demonstrating how easy it is to create, read, update, and delete data with just a few lines of code.
Minimal APIs are ideal for microservices, small applications, or scenarios where performance and simplicity matter most. As your application grows, you can still integrate advanced features like dependency injection, validation, authentication, and Swagger-based documentation — all while maintaining the lightweight nature of the Minimal API approach.
In short, Minimal APIs empower developers to build faster, deploy lighter, and maintain cleaner codebases, making them a perfect fit for today’s cloud-native and serverless architectures.
To view or download the source code click here
Thanks for reading